javaMail

javaMail

javaMail

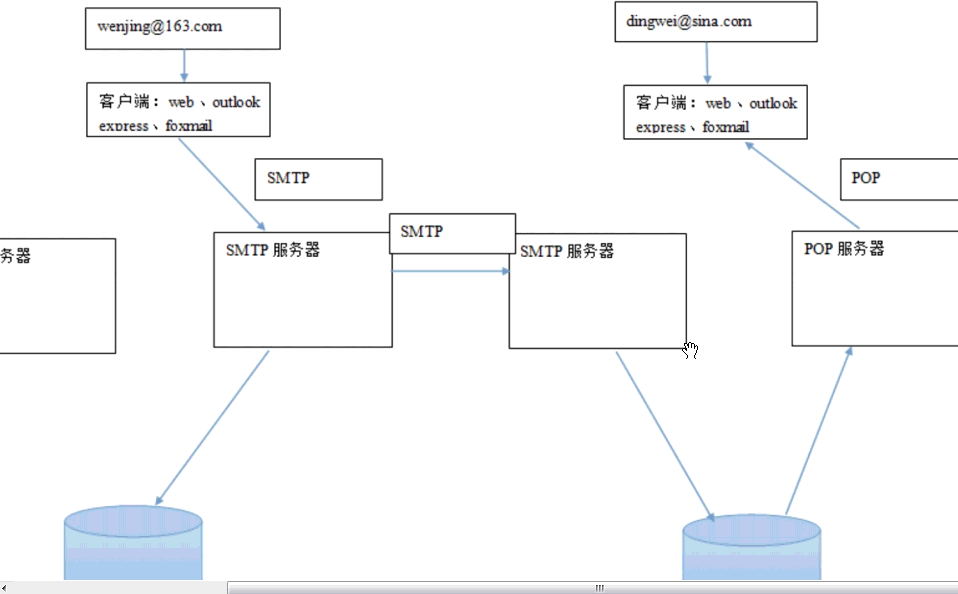
  • SMTP: Simple Message Transfer Protocal 发送协议 默认端口:25
  • POP:Post Office Protocal 邮局协议。POP3这个版本用的最多,端口:110

发邮件的过程:
使用代码发邮件

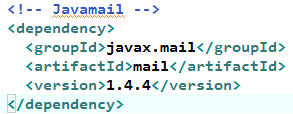
  1. 引入依赖

  • 在pom.xml中引入依赖

  • 还有与Spring整合的

  1. 具体业务,当新员工入职的时候发送邮件
1
2
3
4
5
6
7
8
9
10
11
12
13
14
15
16
17
18
19
20
21
22
23
24
25
26
27
28
29
30
31
32
33
34
35
//1. 设置邮件的一些信息
Properties props = new Properties();
//发送邮件的服务器地址下面是网易的,qq的就是stmp.qq.com  新浪:stmp.sina.com
props.put("mail.smtp.host","smtp.163.com");
props.put("mail.smtp.auth","true");  //身份认证,一般都会开
//2. 创建Session对象
Session session = Session.getInstance(props);
//3.创建MimeMessage,邮件的消息对象
MimeMessage message = new MimeMessage(session);
//4.设置发件人
Address fromAddr = new InternetAddress("zc@163.com");
message.setFrom(fromAddr);
//5.设置收件人
Address toAddr = new InternetAddress(john@163.com);
message.setRecipient(RecipientType.TO,toAddr);
//6.设置邮件的主题
message.setSubject("项目进展顺序");
//7.设置邮件的正文
message.setText("项目进展顺序,所有兄弟们都非常努力,老板今天可以请吃饭");
message.saveChanges();//保存更新
//8.得到火箭
Transport transport = session.getTransport("smtp");
transport.connect("smtp.163.com", "zc@163.com", "密码");//设置了火箭的发射地址
transport.sendMessage(message, message.getAllRecipients());//发送具体内容及接收人
transport.close();

引入到项目中,入职员工后发送邮件

  • 在数据库增加邮件字段
  • 发送邮件的代码可以封装成一个Utils,在Service完成业务
  • 邮件发送的工作,需要用到网络,比较耗时。并且也是一个独立的任务
  • 所以可以开启一个新线程,来发送

    1
    2
    3
    4
    5
    6
    7
    8
    9
    10
    11
    Thread th = new Thread(new Runnable(){
        public void run(){
               try{
                 MailUtil.sendMsg(entity.getUserinfo().getEmail(),"新员工入职信息","欢迎"+entity.getUserinfo().getName()+"加入xxx,您的登录名是"+entity.getUsername()+"密码是:"+entity.getPassword());
            }catch(Exception e){
                 e.printStackTrace();
            }
        }
    });
    //启动线程
    th.start();
  • 因为匿名内部类使用外边的变量要加final。所以在外边的entity上加final

  • 这里的异常要捕获,因为有事务,所以在这的异常要捕获,即使失败了自己处理就行,不会影响员工入职

javaMail与Spring整合

  • 引入pom依赖前面已经引了
  • 创建一个配置文件mail.properties

    1
    2
    3
    4
    mail.host=smtp.163.com
    mail.username=发送人用户名
    mail.password=密码
    mail.from=zc@163.com
  • 创建一个applicationContext-mail配置文件,先加载mail.properties
    <context:property-placeholder location="classpath:mail.properties" />

  • 然后

1
2
3
4
5
6
7
8
9
10
11
12
13
14
15
16
17
18
19
<!-- 简单消息对象创建 -->
<bean id="mailMessage" class="org.springframework.mail.SimpleMailMessage">
     <property name="from" value="${mail.from}"></property>
</bean>
<!-- 2.创建发送器 -->    
<bean id="mailSender" class="org.springframework.mail.javamail.JavaMailSenderImpl">
     <property name="host" value="${mail.host}"></property>
     <property name="username" value="${mail.username}"></property>
     <property name="password" value="${mail.password}"></property>
     <property name="defaultEncoding" value="UTF-8"></property>
     <property name="javaMailProperties">
        <props>
             <prop key="mail.smtp.auth">true</prop>
             <prop key="mail.debug">true</prop>
             <prop key="mail.smtp.timeout">0</prop>
        </props>
     </property>
</bean>
  • 测试一下
    1
    2
    3
    4
    5
    6
    7
    8
    9
    10
    11
    12
    13
    @Test
    public void testJavaMail() throws Exception{
        ApplicationContext ac = new ClassPathXmlApplicationContext("classpath:spring/applicationContext-mail.xml");
        //得到了简单邮件的消息对象
        SimpleMailMessage smm = (SimpleMailMessage) ac.getBean("mailMessage");
        smm.setTo("113@qq.com");
        smm.setSubject("今天晚上约你");
        smm.setText("本人是一个18岁的小姑娘,相约回龙观东大街");
        //得到发送器
        JavaMailSender mailSender = (JavaMailSender) ac.getBean("mailSender");
        //发送
        mailSender.send(smm);
    }

  • 整合进ssh,在ServiceImpl中把mailMessagemailSender注入

    1
    2
    3
    4
    5
    6
    7
    8
    9
    10
    11
    12
    13
    14
    //使用spring与javaMail实现新员工入职时邮件的发送
    Thread th  = new Thread(new Runnable() {
        public void run() {
            try {
                mailMessage.setTo(entity.getUserinfo().getEmail());
                mailMessage.setSubject("新员工入职信息");
                mailMessage.setText("欢迎"+entity.getUserinfo().getName()+"加入传智播客集团,您在公司的账号:"+entity.getUserName()+",密码:"+SysConstant.DEFAULT_PASS);
                mailSender.send(mailMessage);//发送邮件
            } catch (Exception e) {
                e.printStackTrace();
            }    
        }
    });
    th.start();
    • SMTP协议(发送邮件的时候控制台中输出):
      • 334 DXNLtYTE0 http协议中请输入用户名
      • 334 UGFzc3dvcmQ6 http协议中请输入密码

发送复杂的内容

发送邮件的时候可能会有图片跟附加文件:
当然首先要引入依赖跟配置配置文件

1
2
3
4
5
6
7
8
9
10
11
12
13
14
15
16
17
18
19
20
21
22
23
24
25
26
27
28
29
@Test
public void testJavaMail() throws Exception{
    ApplicationContext ac = new ClassPathXmlApplicationContext("classpath:spring/applicationContext-mail.xml");
    //得到发送器
    JavaMailSender mailSender = (JavaMailSender) ac.getBean("mailSender");
    //得到一个MimeMessage对象
    MimeMessage message = mailSender.createMimeMessage();
    //产生出一个MimeMessageHelper helper 
    MimeMessageHelper helper = new MimeMessageHelper(message, true);//工具类本质是操作message消息   true代表可以带附件,图片
    //3.使用helper工具类,设置邮件的发送者,接收者,主题,正文
    helper.setFrom("itheima14@163.com");
    helper.setTo("3462420264@qq.com");
    helper.setSubject("发送图片和附件");
    helper.setText("<html><head></head><body><h1>hello!!spring image html mail</h1><a href=http://www.baidu.com>baidu</a><br/><img src='cid:image' /></body></html>", true);
    //指定cid的取值
    FileSystemResource imgResource = new FileSystemResource(new File("E:/图片路劲.png"));
    helper.addInline("image", imgResource);
    //带附件
    FileSystemResource fileResource = new FileSystemResource(new File("E:/附加文件路劲.zip"));
    helper.addAttachment("javamail1_4_4.zip", fileResource);
    //发送
    mailSender.send(message);
}
张冲 wechat
欢迎扫一扫上面的微信关注我,一起交流!
坚持原创技术分享,您的支持将鼓励我继续创,点击打赏!